Historically as an organisation we had simply connected to the Internet via resilient managed connections from a single provider. This had worked well for the most part, but was a little restrictive when we had experienced transient issues between our data centre and remote sites or Software-as-a–Service (SaaS) companies like Microsoft Office 365. A problem at the peering point between our service provider and Microsoft would result in an outage on a path that we couldn’t move away from. All we could do was report it and wait.
In addition, as our IP addressing was from the service provider’s own block, we would need to change all of the IPs on our Internet-facing services just to move to a different provider if we were not receiving a good service.
The answer to these weaknesses was to obtain our own publicly routable IP address block and form peering relationships with providers ourselves using the Border Gateway Protocol (BGP). BGP is the routing protocol of the Internet. To connect your browser to this website, some of the routers along the path will be running BGP.
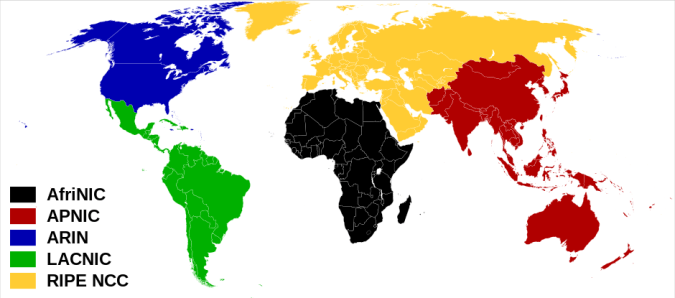
The first step was to register with our Regional Internet Registry (RIR). As we are based in the UK we are covered by RIPE NCC. Depending upon where you are in the world, your registry may be different.
- African Network Information Center (AFRINIC) – Africa
- American Registry for Internet Numbers (ARIN) – United States, Canada, Caribbean Region & Antarctica
- Asia-Pacific Network Information Centre (APNIC) – Asia, Australia, New Zealand
- Latin America and Caribbean Network Information Centre (LACNIC) – Latin America
- Réseaux IP Européens Network Coordination Centre (RIPE NCC) – Europe, Russia, Middle East & Central Asia
Registration means that your organisation becomes a Local Internet Registry (LIR). At the time of writing, the fees are 2000 EUR one-time registration fee and an annual subscription of 1400 EUR.
As part of the subscription, RIPE NCC run a number of courses in most countries within the region. I can personally recommend the LIR & RIPE Database course as a good overview of your new membership. As an LIR, it will be your responsibility to update the RIPE database with your IP assignments.
As IPv4 address space is extremely limited, each new LIR will receive a single /22 block of IP addresses (1024 addresses). There are fewer limitations on IPv6 address space and any LIR can request a /32 block (79,228,162,514,264,337,593,543,950,336 addresses) if they have plans to use it within two years.
In addition to your shiny new IP block, you need to request another resource from your RIR. To be able to peer with BGP you will need an Autonomous System (AS) number. The AS number represents your organisation and can have multiple IP subnets announced from it. They come in 16bit and 32bit variants, although the shorter 16bit numbers are limited and you may need a good reason if requesting them. This reason is usually that you are peering with older equipment which doesn’t support 32bit AS numbers.
Aside from a few other metrics such as weight and local preference, the BGP path selection algorithm will choose the path that traverses the fewest number of Autonomous Systems. BGP doesn’t care if there are 2 routers or 200 within an AS, although the algorithm could be influenced with a number of methods if the 200 router path was taken.
Now that we have our number resources, what do we do with them? You will need a decent router that is capable of running BGP and accepting the full Internet routing table if required. You can choose to just accept a default route (or a partial set of routes) from your provider(s), although if you want some flexibility with the route that your traffic takes then you will want full tables and multiple providers. Your choice of router will need to be based upon your own traffic levels and feature requirements, but I can definitely recommend either the Juniper MX series or Cisco ASR1k series as good starting points. I won’t go into the detail of configuring BGP here, although my previous post on Juniper BGP Peering might be a good place to look for some examples.

Juniper MX104
Where do we put these new routers? You could simply order circuits back to your premises from a transit provider and peer with BGP. This would work, but then if you want to change provider or add different peering relationships you will need to install new circuits or at least work with your provider to get that traffic to you over the existing circuit. Anyone who has ordered fibre circuits in the UK knows that it takes months and consistently makes you want to stick things in your eyes, so the fewer we need to order the better.
What if there were a location where hundreds of different providers and organisations were located and you could simply connect between routers hosted in the same building? You could then install your router in this location and connect to it there from your own premises. Well, this is what an Internet Exchange Point (IXP) is. IXPs such as the London Internet Exchange (LINX) or London Network Access Point (LONAP) are basically networks of Ethernet switches (known as peering LANs) to which members can connect their routers for easy peering between themselves. IXPs are usually situated in large data centres, such as the various Equinix and Telehouse facilities in London.

Harbour Exchange, London Docklands (Equinix LD8)
If you join an IXP such as LINX or LONAP, this is known as public peering. You are connecting to other members over a shared LAN for mutual benefit. As you are connecting directly, you will no longer pay transit fees when sending traffic between you and the path will be direct instead of via other networks. The benefits of joining an IXP will need to be weighed with the membership costs (currently £1200 per year for LINX as an example).
You can also negotiate private peering with other organisations. To connect privately, you arrange for a cross-connect between racks in your data centre facility. Cross-connects are usually purchased from the data centre operator and have a setup charge and an annual rental. The charges differ significantly per data centre, but as a very rough guide expect to pay £1000 for setup and another £1000 per year.
As most of the IXP data centres are popular, they are usually a good choice for private peering as well as public. To find a suitable facility you can use the peering database. PeeringDB lists most facilities and the organisations with a Point-of-Presence (POP) there. The database also lists the peering policies for those organisations so that you can check their requirements.

So, you have done your research and have chosen facilities with access to IXPs and good private peering options. You will now need rack space and power for your router. The first thing to know is that this is expensive real estate. Unless you are a large organisation who needs a number of racks or you have a plan to host servers, you will probably want to rent a quarter or half a rack from a reseller. Have a look at your chosen facilities website to find a list of their resellers.
Security is understandably high at most facilities, so don’t expect to be able to turn up unannounced. You will usually need an access request code from your reseller in advance of your visit for the specific floor and suite. Ensure that you take photo identification and allow for additional time to go through procedures such as training your biometric scans.
We have briefly discussed public and private peering, which would provide better paths to specific networks, but how do we access the rest of the Internet? This is where transit comes in. You are usually not allowed to use an IXPs peering LAN for transit, so you will need another private peering and cross-connect. The difference here is that the provider would send you not just their own routes but either a default route or the full Internet routing table.
IP transit companies vary significantly in both cost and quality. To save on circuit costs, you might want to choose a company which already have a point-of-presence in your data centre. The transit companies with the best connectivity are usually the large ‘Tier 1’ providers, although there a plenty of other providers who are large but are not currently classified as Tier 1 (Cogent, Hurricane Electric etc).
Tier 1 means that the provider can reach every other network on the Internet without paying for transit or peering. Often, your local ISP is a Tier 2 or Tier 3 provider, meaning that they purchase transit to reach a portion of the Internet. If you’ve not been involved in peering then you can be forgiven for not knowing some of the big Tier 1 players listed below.
- Level 3 Communications
- Global Telecom & Technology (GTT)
- NTT Communications
- Telia Carrier
- Tata Communications
- Liberty Global
Transit not only provides you with access to the rest of the Internet, but they will also announce your own prefixes so that everyone else can reach you. It may be that your public and private peerings also receive your routes again, but as they can get to you directly, that path will be the favoured unless it goes down.
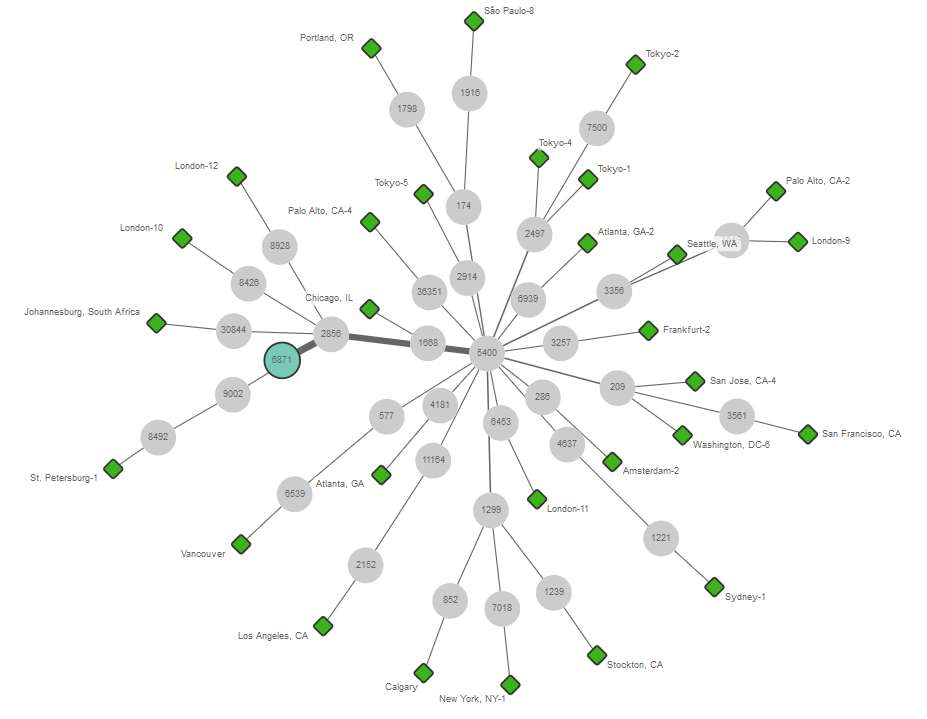
ThousandEyes BGP Monitor View – Worldwide Prefix Reachability
You will probably need out-of-band access to your remote router, as you don’t want to have to drive for hours just to reverse a bad keystroke. With Juniper you have the wonderful ‘commit confirmed’ command that will rollback your changes automatically after 10 minutes unless you type ‘commit’ again, but it still helps to have console access occasionally. We have just ordered a couple of the OpenGear 4G Console Servers, so I’ll no doubt do a post about those once we deploy them.
In the words of Forrest Gump, that’s all I have to say about that.

